In this blog post I want to show how I integrated Stripe, a very popular and well known payment gateway, into an ASP.NET Core MVC Application. The application that I have built offers three subscription plans: Basic, Professional and Enterprise. Depending on the subscription plan selected at sign up, the user will get billed automatically every month, as long as they have an active account. This is the first part that will show how I setup Stripe and how to interact with the API.
- Part 1: Setup and Configuration - This blog post
- Part 2: Subscription handling
- Part 3: WebHooks
Stripe
Stripe is very popular not only because of their well documented APIs, simple and straight forward approach for developers, but also because of their clear pricing model.
We have to watch out here: we are working with very sensitive data (Credit card numbers and other personal information), to be allowed to receive and store that data on my server, I would need to be PCI Compliant. But this is not an easy task for small companies or a single person. Most payment gateways offer a solution for this: As an application developer you display the order details to the customer and if they agree to purchase, they get redirected to a page hosted by the payment gateway. After the purchase is complete the customer gets redirected back.
Stripe offers multiple ways on handling credit card and user information. The one I will take a look at is using their JavaScript API. By using this API we can send the credit card information directly to the Stripe's servers, and we will only receive a token. That we can then use in our backend to make the purchase. With this in place we will not need to be PCI Compliant because we are only working with that special token provided by Stripe.
Setup Stripe
First we need to create a Stripe Account. Go to https://stripe.com and register for a new account.
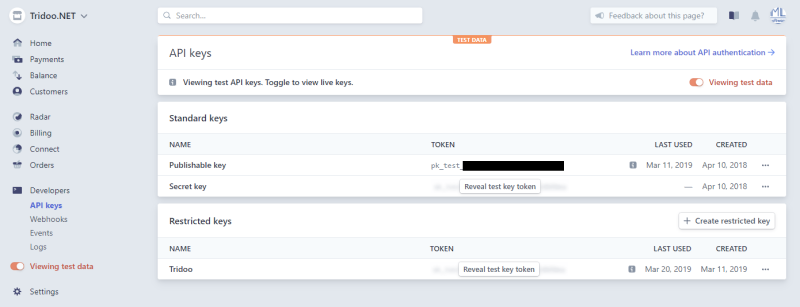
All we need from the Dashboard is the SecretKey and the PublishableKey, copy them for later. You can also create a custom restricted key for your application. Just make sure to select the proper permissions that are required. If not the API will reject the calls.
Make sure that you are
Viewing test dataso that you retrieve the tokens for the test environment
Integrate with ASP.NET Core
I used a NuGet Package called Stripe.net to connect to the Stripe API. It would also be possible to construct the HTTP calls, but why do it manually if there is a nice library that handles this for us, and is being maintained actively.
Run the following command or use the NuGet Package Manager inside Visual Studio to add the package to the project.
dotnet add package Stripe.net
The Stripe API requires two API Keys to be added to our configuration. Stripe offers a test environment which I recommend using for anything else than production.
Do not hard code these API keys into your source code. Add them to your User Secrets and for a Production environment use something like
Azure Key Vault
"Stripe" : {
    "SecretKey": "sk_test_.....",
    "PublishableKey": "pk_test_......"
}
Then we need to configure Stipe.net to use the secret key in our Startup.cs
StripeConfiguration.SetApiKey(configuration["Stripe:SecretKey"]);
Now we are able to call into our stripe account with the help of Stripe.net.
Setting up Products and Pricing Plans
As mentioned earlier Stripe offers a test environment, where all data can be cleared with the push of a single button. Which is great during development and testing scenarios. But setting up the products and pricing plans after clearing the data is a pain. To overcome this pain I implemented a startup task (what I mean by a startup task is explained here by Andrew Lock) that reads a JSON file that contains the products and pricing plans, and creates these objects in my Stripe account.
{
  "Products": [
    {
      "Name": "Tridoo.NET",
      "StatementDescription": "Tridoo.NET",
      "Plans": [
        {
          "Name": "Basic",
          "PricePerUnit": 500,
          "TrialPeriod": 15,
          "Metadata": {
            "MaxUsers": "1",
            "MaxRooms": "4",
            "EmailSupport": "false"
          }
        },
        {
          "Name": "Professional",
          "PricePerUnit": 2000,
          "TrialPeriod": 15,
          "Metadata": {
            "MaxUsers": "6",
            "MaxRooms": "25",
            "EmailSupport": "true"
          }
        },
        {
          "Name": "Enterprise",
          "PricePerUnit": 4500,
          "TrialPeriod": 15,
          "Metadata": {
            "MaxUsers": "15",
            "MaxRooms": "100",
            "EmailSupport": "true"
          }
        }
      ]
    }
  ]
}
I also added some metadata to the pricing plan that I can use later on to check if the tenant may add any more users or if they need to upgrade their subscription plan to do so.
After deserializing the JSON into the required structure I used the Stipe.net services to create the product and the three pricing plans as defined.
private async Task ConfigureStripe(StripeConfiguration stripeConfiguration)
{
    var productService = new ProductService();
    var planService = new PlanService();

    var products = await productService.ListAsync();
    var plans = await planService.ListAsync();

    foreach (var product in stripeConfiguration.Products.ToList())
    {
        if (!products.Any(x => x.Name.Equals(product.Name, StringComparison.InvariantCultureIgnoreCase)))
        {
            var productOptions = new ProductCreateOptions
            {
                Name = product.Name,
                StatementDescriptor = product.StatementDescription,
                Metadata = product.Metadata,
                Type = "service"
            };

            var newProduct = await productService.CreateAsync(productOptions);
            product.Id = newProduct.Id;
        }

        foreach (var plan in product.Plans)
        {
            if (!plans.Any(x => x.Nickname.Equals(plan.Name)))
            {
                await planService.CreateAsync(new PlanCreateOptions
                {
                    Nickname = plan.Name,
                    Amount = plan.PricePerUnit,
                    TrialPeriodDays = plan.TrialPeriod,
                    Metadata = plan.Metadata,
                    ProductId = product.Id,
                    Interval = "month",
                    Currency = "chf"
                });
            }
        }
    }
}
Now we have everything in place, when we delete the test data in the Stripe Dashboard we can restart our application and it automatically recreates the desired products and service plans.
Summary
This has been part 1 of my mini series about integrating Stripe with ASP.NET Core. We can now automatically setup Stripe products and service plans as required for our application.
In the next part I will show how to actually subscribe a user (or in my case a Tenant) to a subscription and especially show how to handle credit cards that will be used for the automatic payment of the subscription fee. If there is anything someone is interested in seeing in this context let me know and I will see if I can integrate it in one of the future parts.
If you like this blog post drop a comment or buy me a coffee at the bottom of the page
comments powered by Disqus