In the first post I showed how to set up an ASP.NET Core 2.2 Application to connect to the Stripe API using Stripe.NET. At the end of the first post I had everything set up so that Products and Pricing Plans are automatically created at application startup if they do not already exist. If you have not read that post you can find it here.
In this post I will focus on how to create a new customer in the application database and also add it to Stripe. The SaaS platform we created does not require a credit card at sign up because the pricing plans offer a free trial for a predefined amount of days. The tenant signs up, tests the application and before the trial ends they will need to enter their credit card / payment details so that the subscription continues.
- Part 1: Setup and Configuration
- Part 2: Subscription handling - This Blog Post
- Part 3: WebHooks
Creating a new Stripe Customer
Before we can start processing payments we need to register a new customer with Stripe. When a new user or in my case a new tenant signs up for the SaaS platform we create a new Stripe customer. In the POST handler of the register tenant razor page we are first creating a new Tenant object, then creating the customer in Stripe and last but not least save the Tenant object with the Stripe CustomerId in our database. We need to store the CustomerId to have a link between our Tenant and the Customer stored in Stripe.
var tenant = new Tenant
{
    Name = Input.Tenant.Name,
    Street = Input.Tenant.Street,
    Zip = Input.Tenant.Zip,
    City = Input.Tenant.City,
    Country = Input.Tenant.Country,
    Email = Input.Tenant.Email,
    WebAddress = Input.Tenant.WebAddress,
    Phone = Input.Tenant.Phone,
    Mobile = Input.Tenant.Mobile
};

// This creates the new stripe customer using the Stripe.NET nuget package
tenant.StripeCustomerId = await _stripeService.CreateCustomer(tenant.Email, tenant.Name);

_dbContext.Tenants.Add(tenant);
await _dbContext.SaveChangesAsync();
We have abstracted the Stripe calls into a StripeService and use that service in our POST handler. The Stripe.NET library has a CustomerService class that exposes the method Create and CreateAsync. We can use those methods to create the customer. All that is required is the email address for the customer. You can add more properties and also metadata similar to the pricing plans. All objects in Stripe have the metadata concept which makes it very dynamic and flexible.
public async Task<string> CreateCustomer(string email, string fullName)
{
    var response = await _customerService.CreateAsync(new CustomerCreateOptions
    {
        Email = email,
        Description = fullName
    });

    return response.Id;
}
So now we have our Stripe customer and the link to our tenant. But during the registration process you can choose between different pricing plans, so we have to create a new subscription for the customer that we created above.
Creating a new Subscription
All we need to create a new subscription for a customer is the Stripe customer Id that we stored along side the tenant and some way to identify the pricing plan that the user selected on the registration page.
So back in the POST handler of the register page we add the following line of code after creating the customer.
await _stripeService.AddSubscription(tenant.StripeCustomerId, tenant.SubscriptionPlanId);
The UI of the registration page has a simple dropdown where the user chooses from the different pricing plans, which displays the name of the pricing plan and the Id as a value.
Then we use the SubscriptionService from Stripe.NET to call the Stripe API and create the subscription for the customer.
public async Task AddSubscription(string customerId, string planId)
{
    _subscriptionService.Create(new SubscriptionCreateOptions
    {
        CustomerId = customerId,
        Items = new List<SubscriptionItemOption>
            {
                new SubscriptionItemOption
                {
                    PlanId = planId,
                    Quantity = 1
                }
            },
        TrialFromPlan = true
    });
}
Again there are many more properties that could be set or changed here. I am just showing a very simple approach with only the required properties. For more information check out the Stripe API reference.
Wow, that was simple. So now we have created a customer with a subscription. Inside of the Stripe Dashboard you should now see the customer and the subscription that we created.
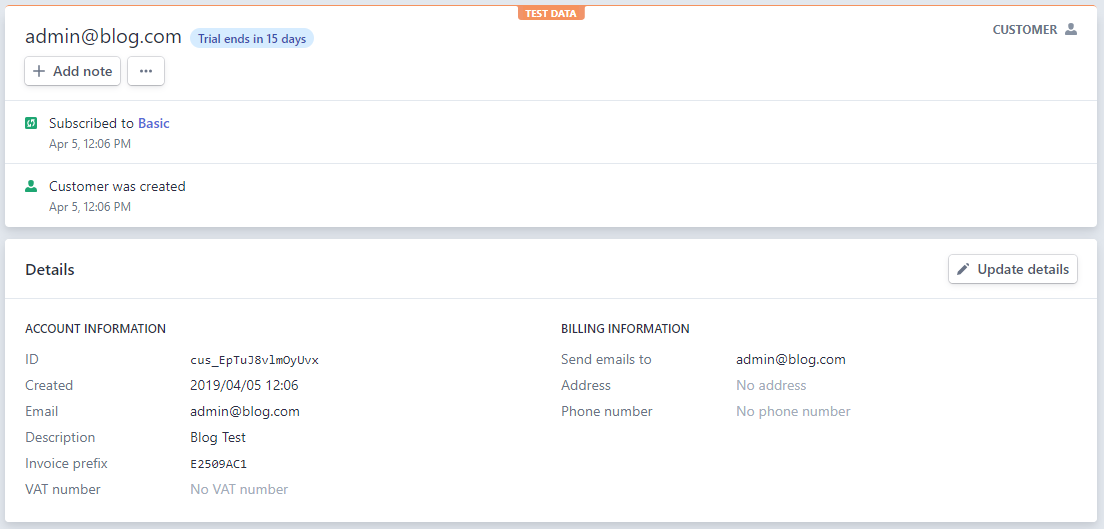
In our SaaS application we created a billing page where an admin user can view the current state of the subscription and also add payment details.
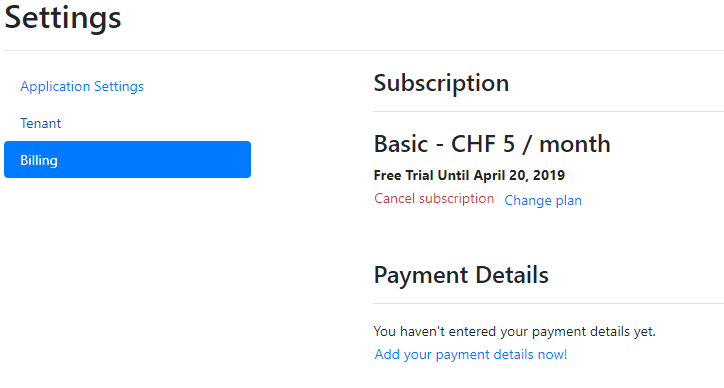
Adding payment details
As I already explained in the first part of this series NEVER store or handle any payment details on your own server.
Stripe offers a way where your system will not get in touch with any of that data and only work with a token. So we do not have to worry about any of the PCI Compliances. Stripe offers a JavaScript library called Stripe.js that I will leverage so that a user can securely enter their payment details. If the user clicks on the link Add your payment details now! a modal dialog gets displayed.
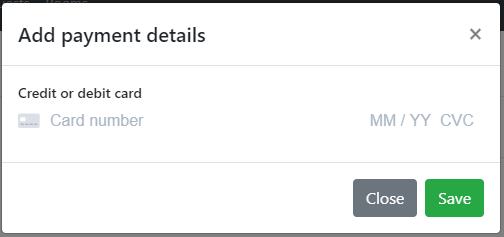
This modal is actually really simple because all we need is a form with some empty place holders that will be filled through Stripe.js.
<div class="modal fade" id="add-payment-details-modal" tabindex="-1" role="dialog" aria-labelledby="add-payment-details-modal-title" aria-hidden="true">
<div class="modal-dialog" role="document">
<div class="modal-content">
<div class="modal-header">
<h5 class="modal-title" id="add-payment-details-modal-title">@Localizer["Add payment details"]</h5>
<button type="button" class="close" data-dismiss="modal" aria-label="Close">
<span aria-hidden="true">×</span>
</button>
</div>
<form asp-controller="Billing" asp-action="AddCreditCard" method="post" id="payment-form">
<div class="modal-body">
<div class="form-group">
<label for="card-element">
Credit or debit card
</label>
<div id="card-element">
<!-- A Stripe Element will be inserted here. -->
</div>
<!-- Used to display form errors. -->
<div id="card-errors" role="alert"></div>
</div>
</div>
<div class="modal-footer">
<button type="button" class="btn btn-secondary" data-dismiss="modal">Close</button>
<button type="submit" class="btn btn-success">Save</button>
</div>
</form>
</div>
</div>
</div>
In the script section of the page is where most of the magic will take place. First we need to include the JavaScript library Stripe.js. Then we create a new Stripe element with the PublicKey that we can get from our configuration, we added some custom styling which of course can be adjust to the sites look and feel and is described in detail on the docs page.
@section Scripts  {
    <script src="https://js.stripe.com/v3/"></script>
    <script>
        $(function () {
            // Create a Stripe client.
            var stripe = Stripe('@Configuration["Stripe:PublicKey"]');

            // Create an instance of Elements.
            var elements = stripe.elements();

            // Custom styling can be passed to options when creating an Element.
            var style = {
                base: {
                    color: '#32325d',
                    fontFamily: '"Helvetica Neue", Helvetica, sans-serif',
                    fontSmoothing: 'antialiased',
                    fontSize: '16px',
                    '::placeholder': {
                        color: '#aab7c4'
                    }
                },
                invalid: {
                    color: '#fa755a',
                    iconColor: '#fa755a'
                }
            };

            // Create an instance of the card Element.
            var card = elements.create('card', { style: style });

            // Add an instance of the card Element into the `card-element` <div>.
            card.mount('#card-element');

            // Handle real-time validation errors from the card Element.
            card.addEventListener('change', function (event) {
                var displayError = document.getElementById('card-errors');
                if (event.error) {
                    displayError.textContent = event.error.message;
                } else {
                    displayError.textContent = '';
                }
            });
        });
    </script>
}
Now if we open the modal dialog we have a nice form that accepts credit card numbers and also validates them properly.

As explained above we need to create a token through the Stripe.js library and then submit that to our backend for further usage. So how do we do this? Just a few lines of JavaScript really.
We add an event listener to our form on submit and prevent the default action so that it is not posted to the backend. The stripe object that we created above offers a createToken function that returns a promise. We pass in the card element that was created while bootstrapping the form and as a result of calling that function we get the token. I said it was simple.
// Handle form submission.
var form = document.getElementById('payment-form');
form.addEventListener('submit', function (event) {
    event.preventDefault();

    stripe.createToken(card).then(function (result) {
        if (result.error) {
            // Inform the user if there was an error.
            var errorElement = document.getElementById('card-errors');
            errorElement.textContent = result.error.message;
        } else {
            // Send the token to the server.
            stripeTokenHandler(result.token);
        }
    });
});
What really happened behind the scenes was that Stripe.js called the Stripe API tokens endpoint with the credit card information. So nothing magical at all, just a simple XHR call to the API that returned the token to us and prevents us from getting in touch with any credit card information on our backend.
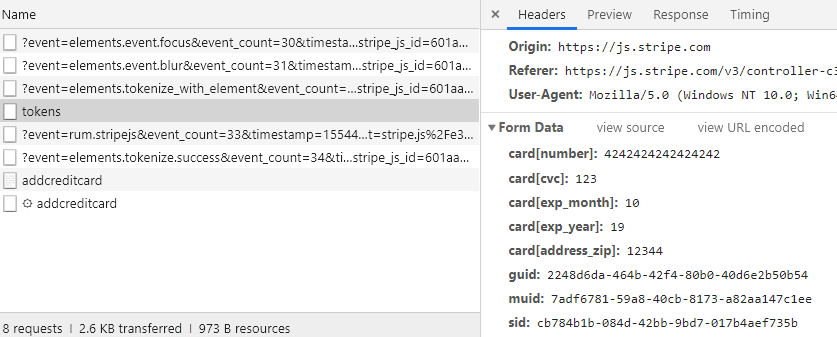
We can then work with the token that was returned to us, send it to our backend...
// Submit the form with the token ID.
function stripeTokenHandler(token) {
    // Insert the token ID into the form so it gets submitted to the server
    var form = document.getElementById('payment-form');
    var hiddenInput = document.createElement('input');
    hiddenInput.setAttribute('type', 'hidden');
    hiddenInput.setAttribute('name', 'stripeToken');
    hiddenInput.setAttribute('value', token.id);
    form.appendChild(hiddenInput);

    // Submit the form
    form.submit();
}
...and create a card for our customer. Well we do not create a card the same way that we created the other objects in Stripe. We rather update the customer and add a source token to the customer. Stripe matches that token and knows that this matches some payment details and adds the card to the customer.
public async Task AddStripeTokenToCustomer(string customerId, string stripeToken)
{
    await _customerService.UpdateAsync(customerId, new CustomerUpdateOptions
    {
        SourceToken = stripeToken
    });
}
If we now go back to the Stripe dashboard we should see the card that we just added in the list of cards for the customer.

Summary
That's it for this post. I tried to show how we use Stripe to handle subscriptions and securely store credit card information outside of our application. Now that we have created a customer with a valid subscription and credit card attached to it he will get automatically billed at the beginning of each new subscription month. Of course there is a lot more to implement like cancelling a subscription, changing plans or updating the payment details. Also don't forget that we need to implement some logic in the application to check if the user that is trying to login still has a valid subscription. But all of these features can be implemented in a similar fashion. Again the documentation is really good for the Stripe API and also the Stripe.NET library follows its concepts throughout all the public calls.
In my next part I will look into the WebHooks capability of Stripe. With this we can inform users a few days before their trial ends that they have to enter their payment details or about payments that failed.
If you like this blog post drop a comment or buy me a coffee at the bottom of the page
comments powered by Disqus